I want to introduce my bouldering gym, a place I spend about 3 evenings a week. This is my primary place of bouldering training. The place is located in two small joint industrial buildings, the tallest wall is maybe 5m tall and the shortest maybe 3m. We have a short overhang, a cave, a slab, and tall overhang, two kilterboards, a moonboard, a slabby long endurance wall, an overhang endurance wall, and one ungraded climbs wall. The mats are of the medium plushness and the workout area is tiny. The staff resets the routes regularly, one wall at a time, maybe once every two weeks. A climber has about 6 weeks before a wall is reset to finish their projects. Finally, once every several weeks, the gym sets red “competition” boulders that are not graded.
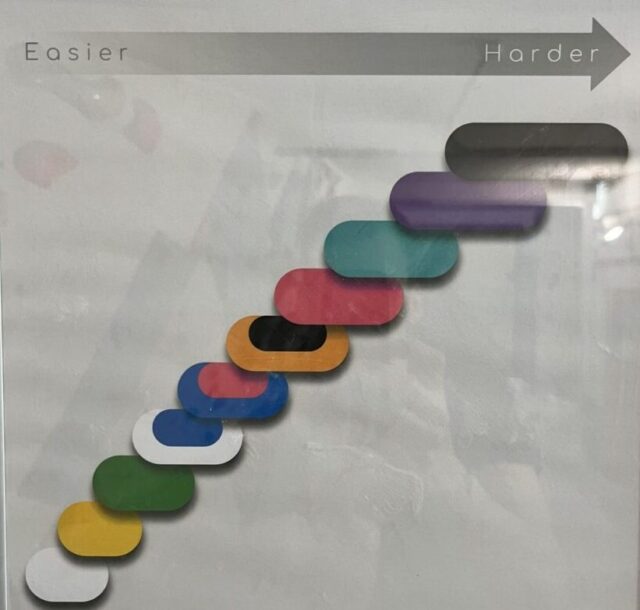
The gym uses a color grading scale and there is no mention of any standard grading anywhere. I will not attempt to provide one myself because I am a V5/V6 climber and I don’t trust myself to grade objectively. And I certainly cannot grade routes I cannot climb. The color scale starts with white and ends with black, see the featured image for details. So far so good. This decision has one issue though; a person climbing at their limit will always climb the same hold types. For everybody who thinks this is a good idea let me offer my counter-argument. The gist is that as the climbers progress they always practice on the same hold types, and dont get exposure to different types of climbing. I feel this is very limiting progress and despite complaints from us, climbers, the staff, refuses to change this. But other than they, they are all very nice people :D. Serious.
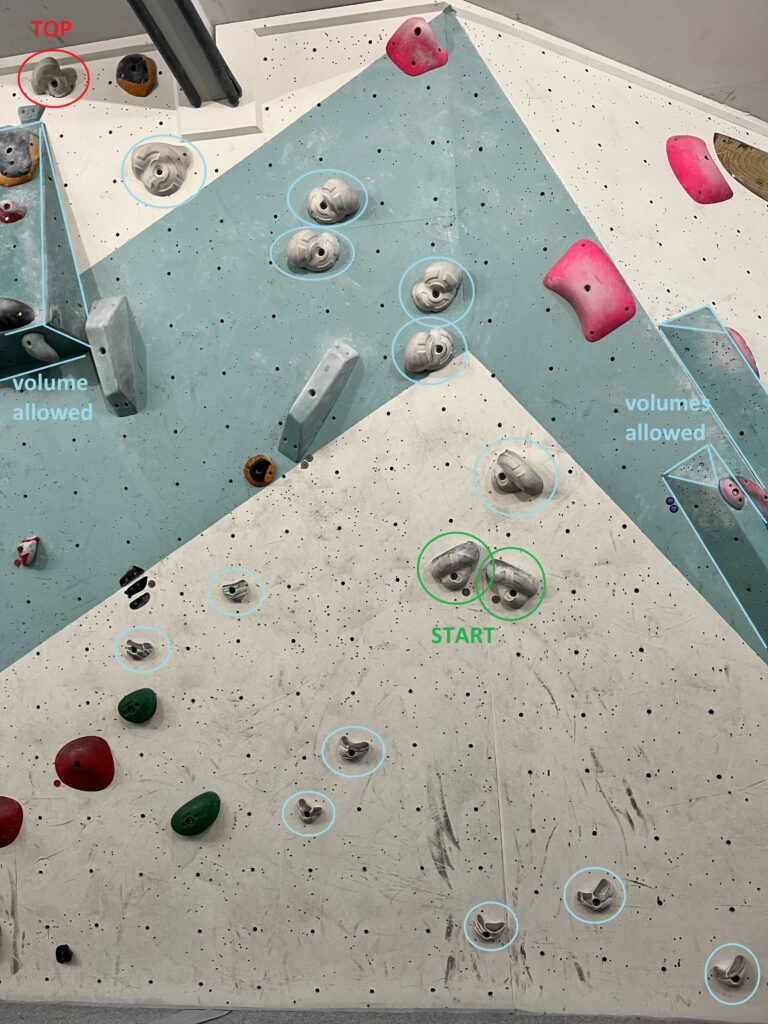
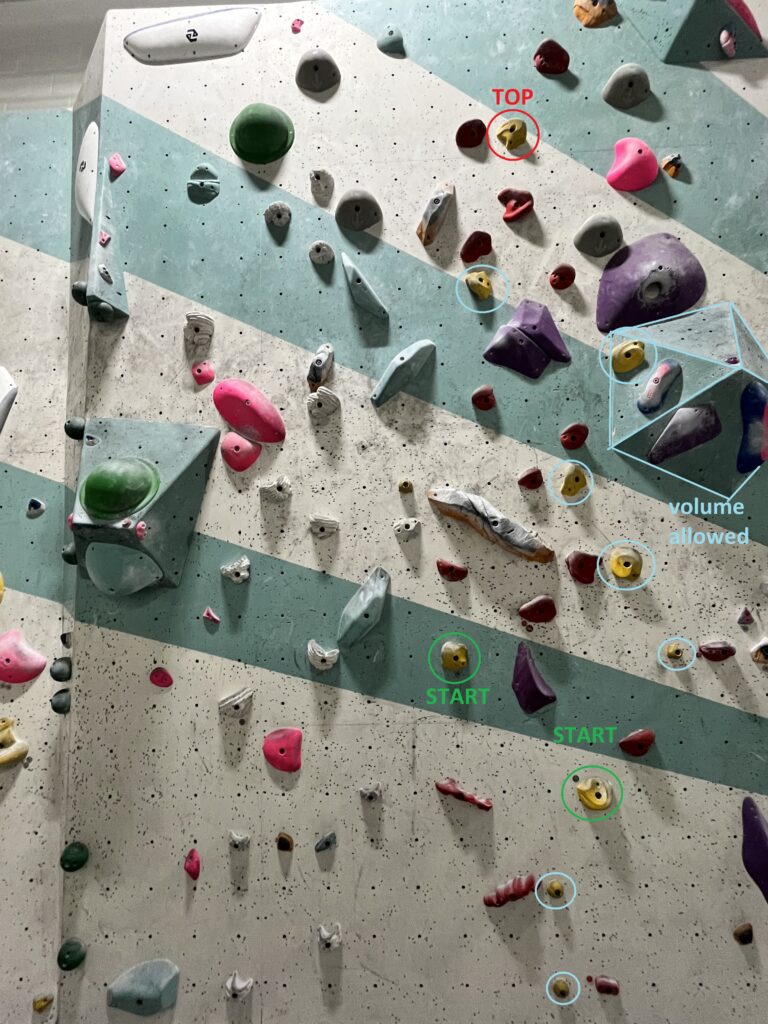
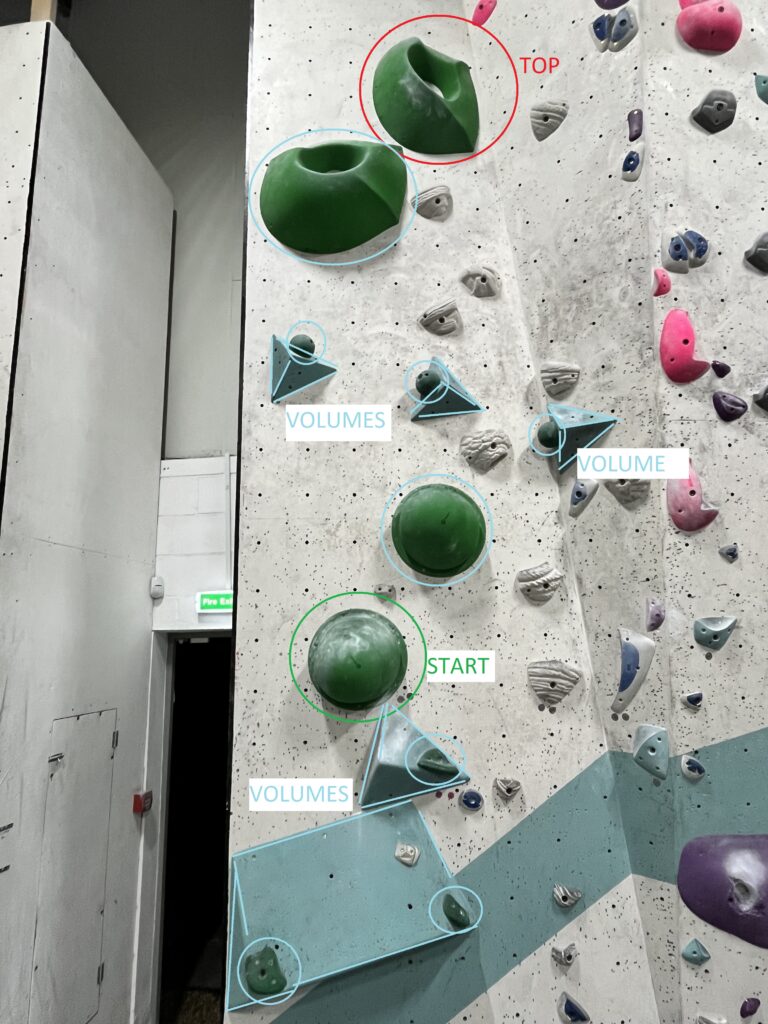
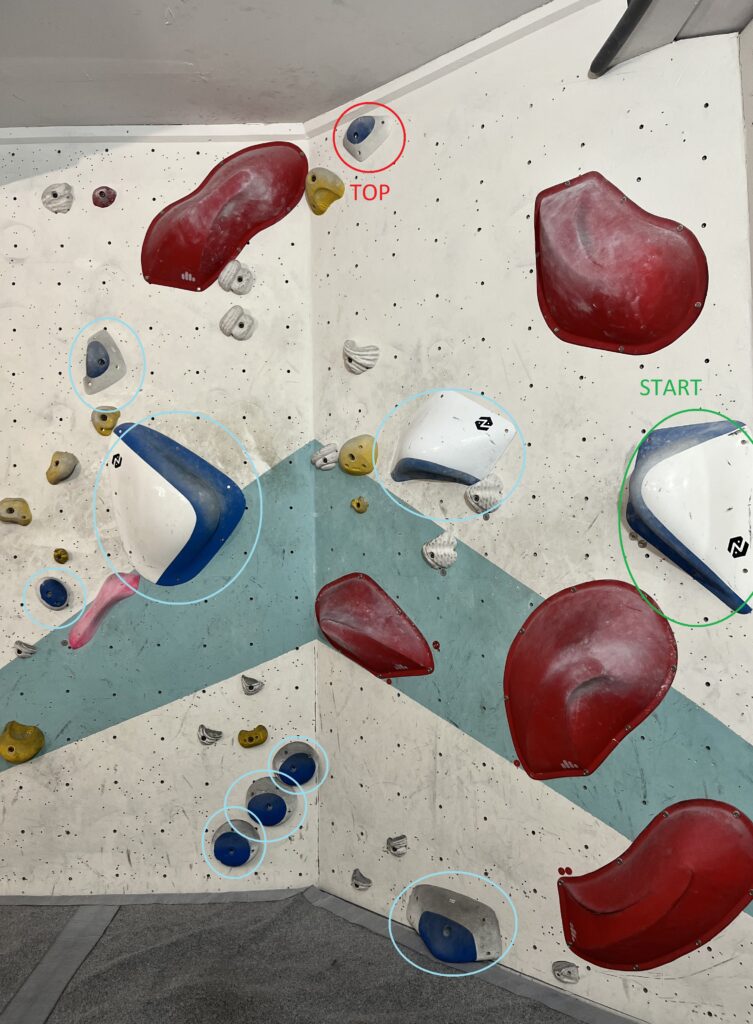
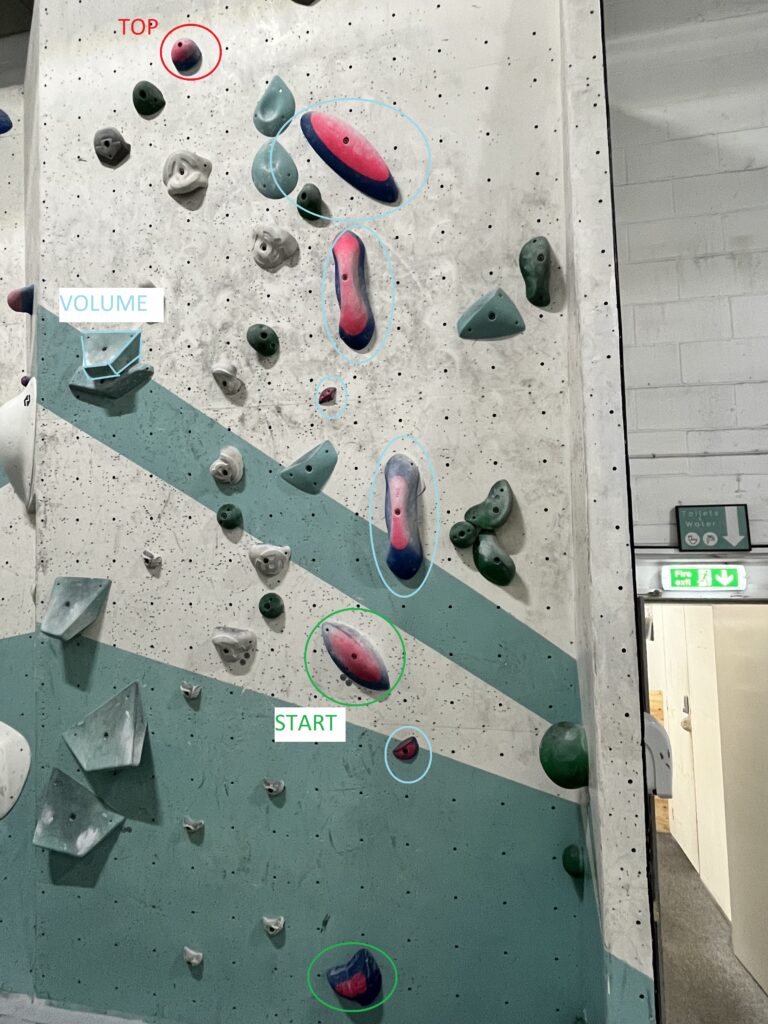
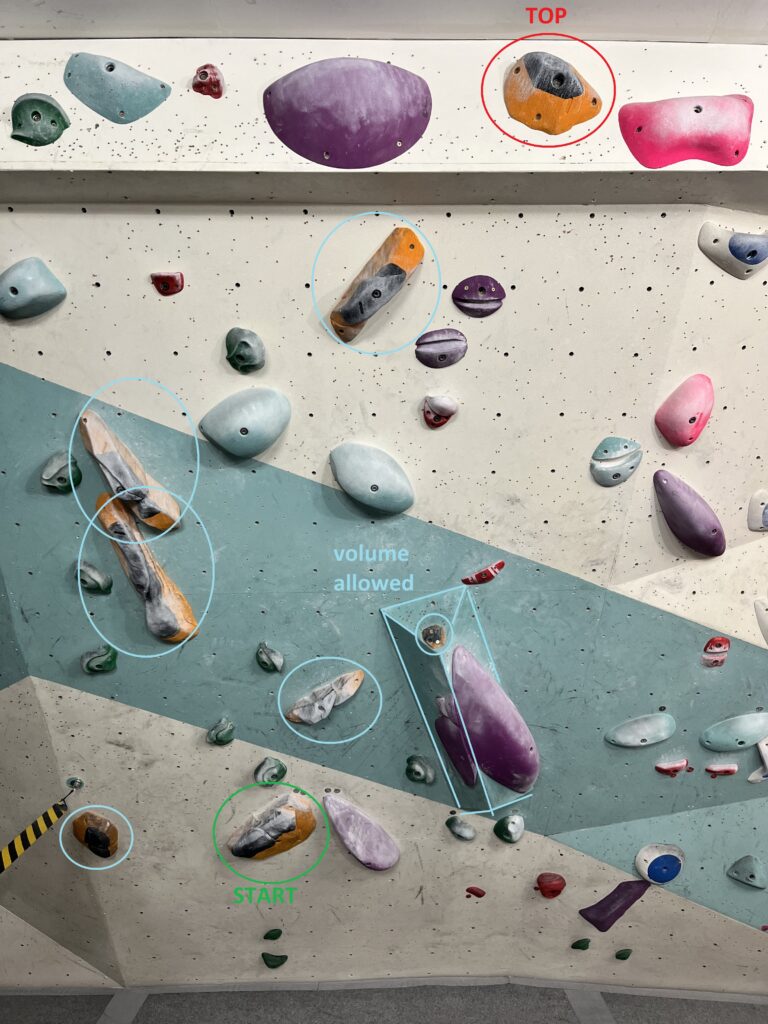
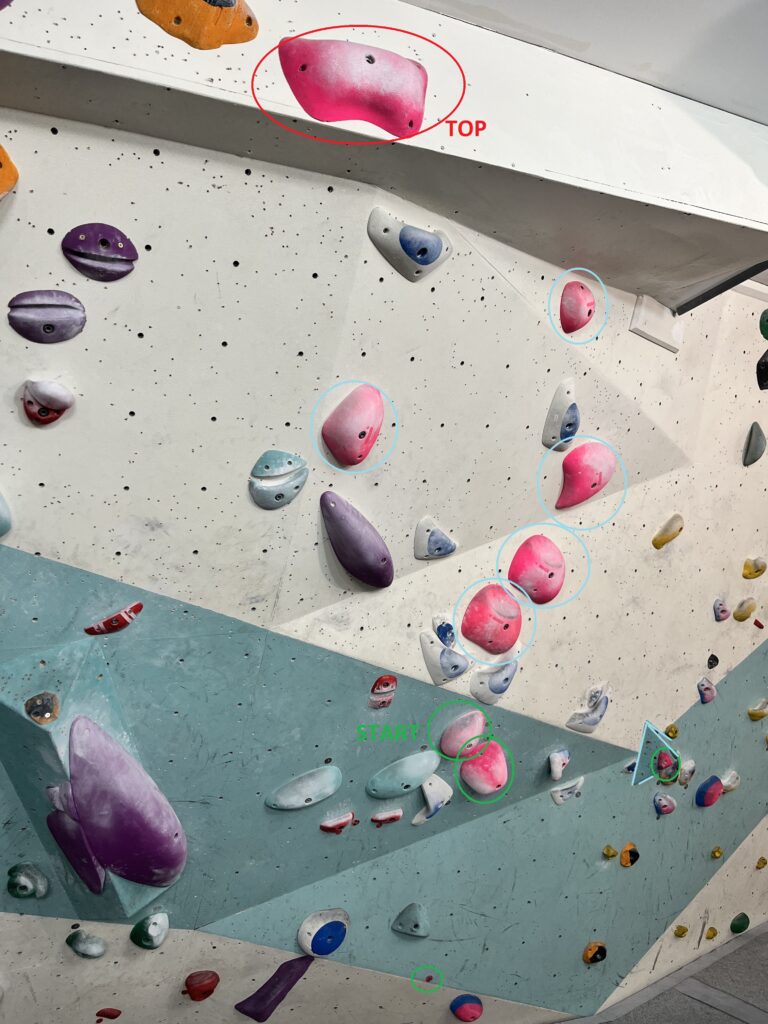
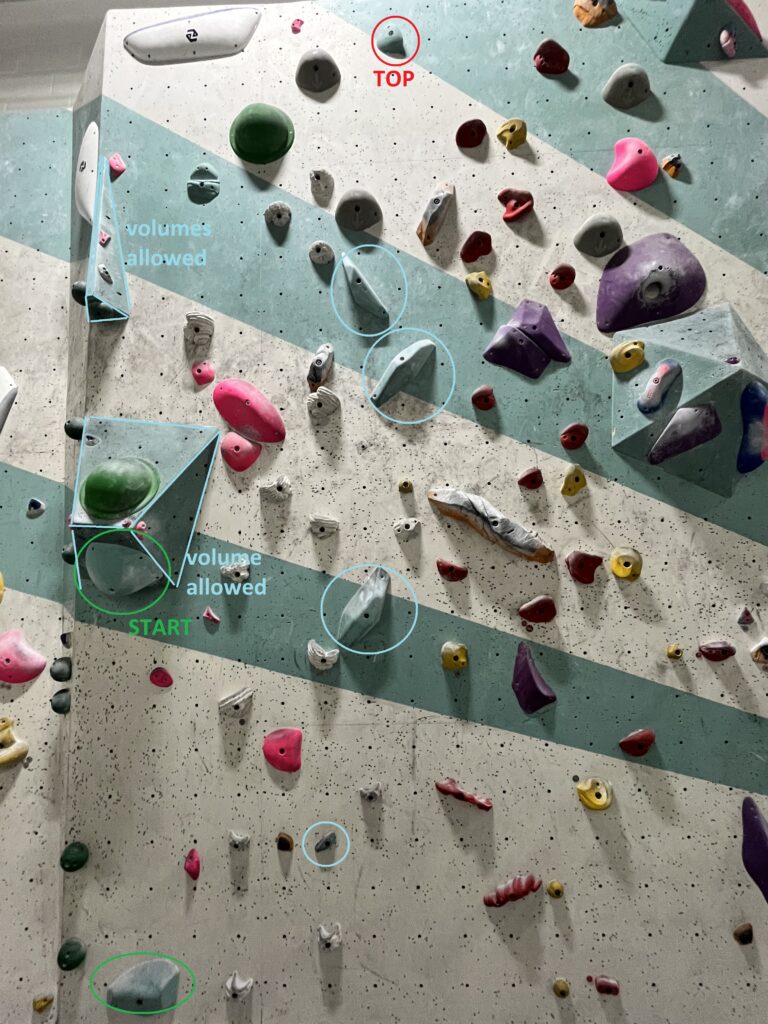
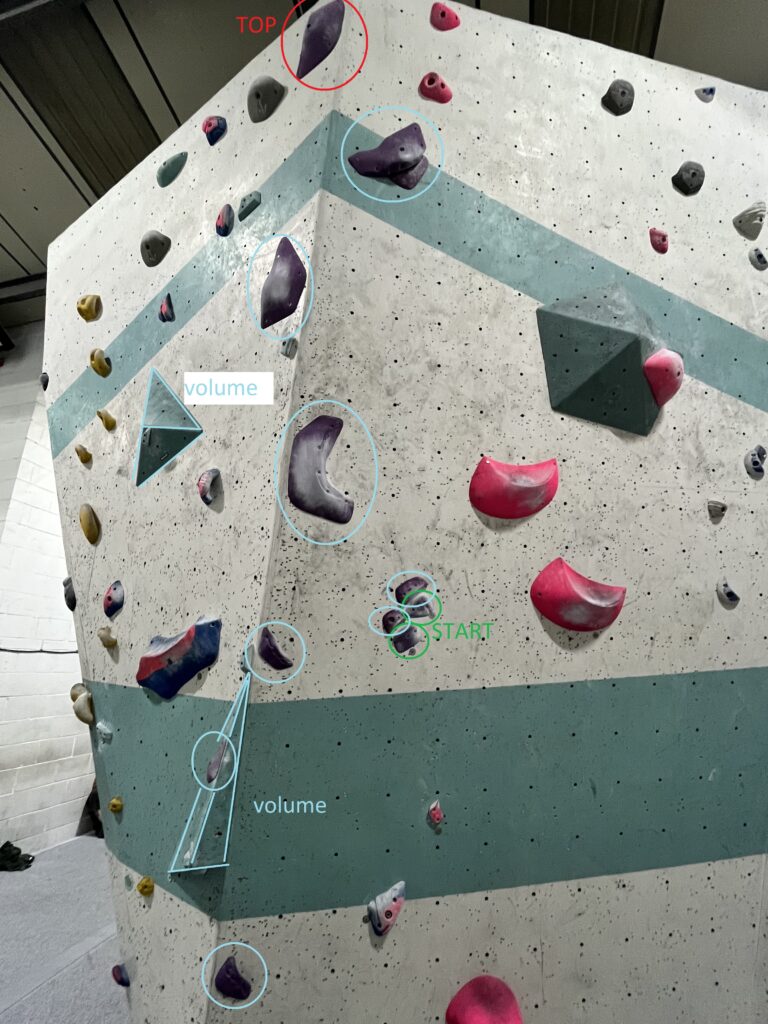
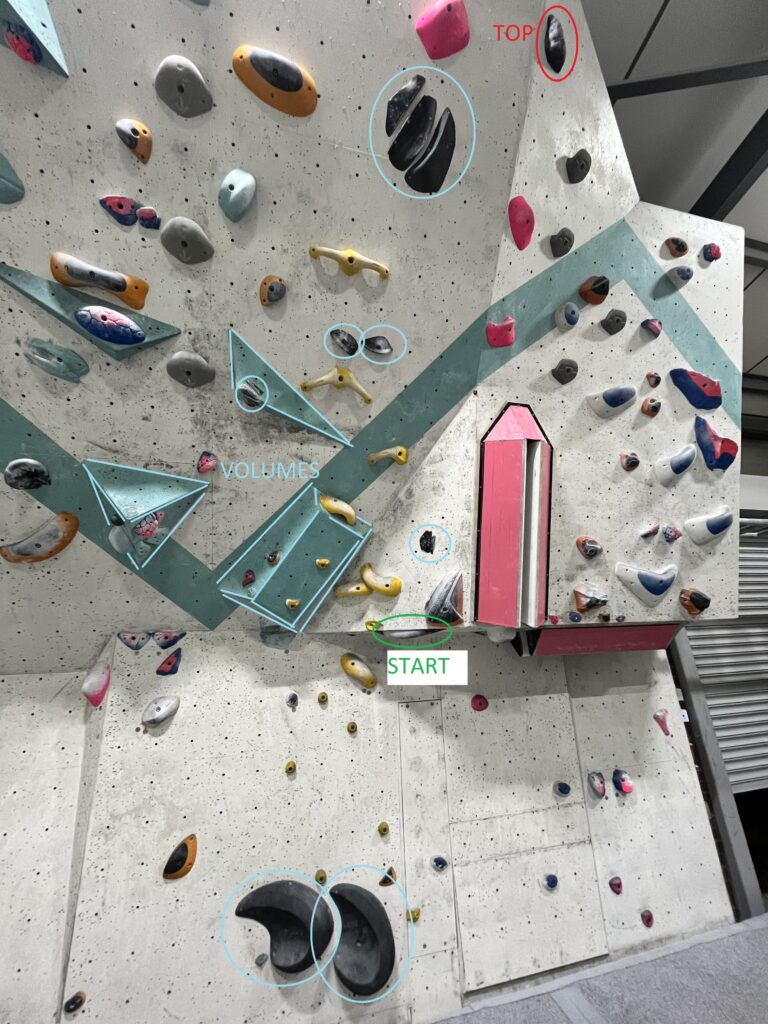
Now let me get to describing what is climbing there like. I took photos of every route difficulty for illustration and highlighted all relevant holds. The starting handholds are always indicated by a metal disk next to them. I chose to use color green to encircle them in my photos. There are usually no defined starting footholds and the climber can choose whichever they like. For this reason, I think I encircled a starting foothold in green color only for the Tiger difficulty for beta-spraying purposes. A climber can use any volumes but they can but these often look like Mint difficulty holds so I took liberty to highlight them in blue for readers. The intermediate hold are also in blue. Finally, the top is encircled in red, although the gym does not mark it, the climber just looks for the highest/furthest hold and they will be correct.
White
All the holds are deep jugs, positioned close to each other, facing up, and the footholds are in the place where you would expect them. I call these routes a ladder, nothing else to say.
Yellow
I am not sure what’s the difference between yellow and white. Maybe the fact that the there is a chance of a side-pull or a under-cling jug. This is the case for the route I choose, just look at the starting holds. The rest are facing up or side-up.
Green
Greens are a BIG departure from what we have seen so far. The holds are often large slopers, but the feet are always very good. I feel this can be a big shock for a starting climber who are used to jugs or maybe really wide crimps, now they have to get creative in how to hold these. The route below calls for pinching the tops and the intermediate are big and small slopers. This is where the gym has really pigeon-holed itself into a bad corner IMHO, because it would be possible to build very interesting routes our of these holds. Instead, we are graced with routes that are about V2 difficulty made out of very interesting holds :sight.
SkyBlue
SkyBlue is a combination of BIG holds and “shallow” jugs but the setting gets interesting and fun, often more so than easier of harder routes. The main feature of SkyBlue is that they are dual-texture and how good the friction is on the blue side. The jugs are “shallow” but one can still feel their fingers curl inside so they feel secure even in most awkward positions. The setters like to utilize downward facing jugs as footholds, I guess to introduce climbers to an idea that our feet can slip. Other than that the beta is always clear at first sight.
The illustrated route starts by standing on the downward facing jug, to the left of a staring handhold. The next move is to go for an under-press as the climber scoots over to the left. From there on, one has to grab the leftmost side-pull, get to a crouching position on the giant triangle and standup for a top which is a shallow jugs. A fun route.
Blink (BluePink)
Up until now, we could rely on position and technique to sent because the holds were good and positioned “correctly”. Blink is where the climber need to utilize raw strength for the first time. The holds are either bumpy slopers, imagine a cauliflower, or smooth pinches and wide crimps. The friction is often bad, I think because the holds are old, greasy, and chalky. SkyBlues feel like a sandpaper compared to Blinks. The beta also often comes down to power more so than technique.
Just look at the route below. The starting holds are generous, but the issue are the next two vertical pinches. It is possible to get your feet as high as possible and lean back, but the initial contact with the holds will be a vertical pinch. There is no cheating here with a flashy technique.
Tiger
The first major point of resistance. This is where you will see a lot of people progressing and this is where I hit my ceiling when I started there. The holds are usually A) pinches with a very coarse and rock-like texture with with tiny ridges, or B) wide crimps that are super smooth, I like climbing on the rock-like pinches a lot because sending a route can come down to studying the hold to find the best point of contact. The setters like to set smooth crimpy tigers in steep overhangs with holds tilted down to keep the challenge. Raw strength and good technique is needed to sent these consistently. Tigers is also the level where we get super tiny footholds for the first time.
The route below is one I have been progressing for a while and I plan to do a more detailed post in the future. To put it shortly, the route is set in a steep overhang. The starting position is with a heel hook that is very slippery and the next three moves are very powerful. Full body tension. The holds are have GOOD parts where to grab them and BAD parts, so it pays off to know where to aim. Before I got a couple things right, I was often too tired to do the last move properly and stick it.
Pink
My current level practice level together with Tigers. These hold are rather varied and include shallow and sharp crimps, slopers, and very narrow pinches. The footholds are often tiny. I think that pink routes often require “weird” beta that might not be apparent at first sight so these are better projected in a group. A lot of regulars practice on these so brush is your real friend.
This route is set in the same overhang as the tiger above. The hardest part for me is the starting position, where you go for cross under-clings at the slopers, a drop-knee on the dimple that sticks out from the volume to the right, and a second tiny foothold is below the slopers. If you can establish the starting position and launch for the 3rd sloper above the start, the rest of the route is 2 power-moves to a penultimate wide pinch and a final jump on the top sloper. All good holds with good friction so even the overhand doesn’t change the difficulty much, and you have decent footholds!
Mint
My current progression level. If you have made it here it means you are a regular. The holds are mostly wide blocky pinches, small crimps, and shallow slopers. Their friction is decent, something between Blink and SkyBlue. I feel the main trick is that even the pinches are slopy. The climbs themselves often rely on volumes maybe because the general volume color is the same as these holds. I wonder is at least the pinches are home-made by the gym.
The route below is one I have been projecting. Its on a mostly vertical wall with little overhang. The start is standing on a large sloper and taking the upper sloper as under-press with both hands. From there you go left leg to a terrible foothold and take the next pinch as under-cling with your right. The next move is a crux. Jump right and up and grab the next pinch with your left without barn-dooring. The main issue is that the pinch is angled downwards so its easy to slip. The climb is still difficult from this point on, mostly because the holds always point in the opposite direction where you would want them and the feet are slippery. But doable, its the jump I have trouble sticking and doing that jump over and over again is uncomfortable because of how bad the launching foothold is.
Puple
I am not sure what to say about purple other than that it’s above my skills. The holds tend to be big and in most circumstances would be good. However, to make the routes challenging, the access is often blocked. There is still a handful of people who project and sent these.
Black
There isn’t much I can say about blacks because they are above my pay grade. I have seen maybe 3 people making a real progress on blacks. The holds are mostly tiny crimps in steep overhangs. Look at the route below. The starting position is the protruding dish and the two large slopers for your feet. So far so good. However, then you have to utilize the volumes and the side high crimp to get to a tiny crimp on the highest volume and get the under-clings. From there on, you launch with your left for the trio of holds and grab the middle one in a pinch, its shallow and sharp. The final hold is a sloper. Well good luck.
Last word
Thanks for reading to the end. Now you know what projecting this or that color means. There is also a the kilterboard and endurance walls which I have started training on recently. I think I will sneak them in my future posts about my projects.
